How To Properly Paint Furniture
Knowing how to properly paint furniture is a worthy skill for any design fan. Everybody loves a DIY project, it saves money and can be highly rewarding to see the result of your hard work at the end.
This is true with a range of furniture items. Purchasing second-hand items for your home and refinishing them can be a great way to save money as well as reduce the size of your carbon footprint.
However, painting furniture can be especially challenging if the base is not prepared correctly.
This site uses ads and affiliate content as an Amazon associate earning on qualifying purchases. Disclosure.
Similarly, using the right paint is a crucial step when it comes to painting furniture. Here’s how you can properly paint your furniture for your next DIY project.
How To Properly Paint Furniture
[toc]
I love a good Facebook marketplace find. And oftentimes, you can score a piece of furniture for cheap, that is just one coat of paint away from a masterpiece.
That was the case with my antique bar cabinet!
I found this beauty on FB Marketplace, and it was in pretty good shape, except for some damage to the wood. She has seen better days!
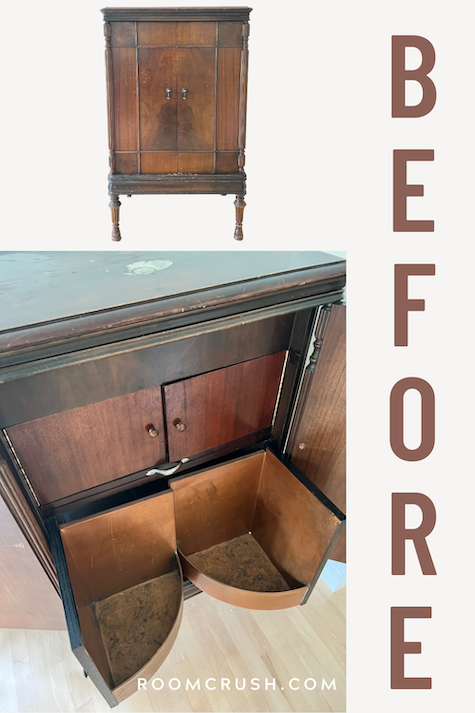
Following the steps below, I was able to give this cabinet a makeover, and now it’s a show-stopping piece in my dining room.
Here’s everything you need to know, to properly paint furniture.
Step One: Gather Supplies
The first thing that you will need to do is make sure that you have all the necessary supplies and tools.
A high-quality wood cleaner that has been made for use on the material that your furniture has been made from is essential.
Wood soaps are recommended unless you are dealing with something made from metal or acrylic.
Similarly, you will need appropriate sandpaper for the furniture. I recommend this 220-grit sanding block if you are sanding by hand without power tools.
Or, you can use this orbital sander along with this type of sandpaper for a better job.
If you are planning to refinish more furniture in the future, I would definitely recommend the orbital sander for sure. Your fingernails and skin will thank you!
Zinsser Bulls Eye 1-2-3 Furniture Primer is also necessary, and it is recommended to use a light shade if possible. These stand out less when they are painted over.
And of course, you will also need high-quality paint in the desired color.
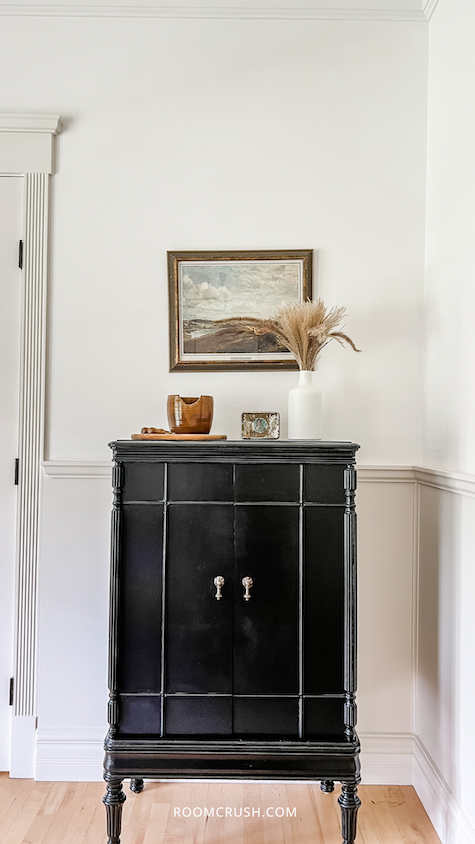
For my bar cabinet, I started with ‘Onyx Black’ paint by Behr, but it turned out way too blue for my liking, so I ended up re-painting it with full black paint. Which was perfect!
When painting furniture, you can use a paintbrush or foam roller, depending on the dimensions of your piece of furniture. I find this foam roller to be the best.
A top coat is also highly recommended, such as wax or any clear sealant.
Everything You Need To Properly Paint Furniture:
Step Two: Prep The Surface
Now that you have all the necessary supplies, it is time to take a look at your piece of furniture. The first thing to do is remove any dust from the surface and clean everything if needed.
Then, you will need to begin sanding the furniture.
This should be done after removing any hardware fittings such as handles or knobs.
Use your wood cleaner and soap and water to clean everything and let it dry before sanding.
This is necessary because it removes any existing glaze or paint, and makes a smoother surface for you to work with. Make sure you are sanding thoroughly and consistently until the entire surface is smooth.
This can be done using a medium grit or fine-grit sandpaper, depending on the quality of your piece of furniture and what is needed to create a smooth painting surface.
Step Three: Apply Primer
Once everything has been thoroughly sanded, you will need to remove any debris from the surface.
This needs to be done before priming because it cannot adhere to small pieces of sawdust that are created during sanding.
Paint on your Furniture Primer using a clean paintbrush and make sure you are covering everywhere that you want to add paint to.
Primer will work by providing a surface for the paint to stick to.
Most oil-based primers are fine for wooden furniture, as long as you are using the correct paint afterward.
Primer also allows the paint to give a more seamless finish, as it can be used to cover all stains and create a blank canvas to work from.
Once you have left the primer to dry completely, you can choose to sand the surface and reapply primer, or go in with the paint. This depends entirely on the directions of your chosen primer.
Make sure you are following them correctly, and avoid skipping steps as much as possible.

Step Four: Paint
The next thing you need to do is paint your furniture. Like priming, it is important to follow the manufacturer’s instructions and apply the correct amount of paint.
This means adding several thin coats or one thick one, depending on the directions.
You can typically achieve a more even and smooth finish when you add several coats of paint using a thin coat each time. You can use a paint sprayer, a roller, or simply a paintbrush.
It is highly recommended that you sand everything lightly before applying the next coat for a smooth and professional-looking finish.
If you are painting a piece of furniture to be used outdoors, then you may need to use a brand of paint that is more durable and water-resistant.
Luckily, these are available in a range of colors and shades, so you will not have to compromise style for functionality.
Step Five: Protect
Once you are happy with how the color has turned out, and it has all dried, you can seal everything with your gloss or sealant.
There are many brands that offer similar products, but it is recommended that you use this protective stain for the best possible finish.
Thoroughly coat the furniture in your sealing agent, and let everything dry completely.
This makes it easier to wipe clean without damaging the paint, and more resistant to moisture as well as another staining.
Of course, furniture that is going to be placed or stored outdoors will need more thorough protection.
Because of this, you may need to purchase a different type of sealant to make the paint last longer.
Make sure you are leaving everything to dry for a while.
This can take around 24 hours, and the furniture should not be touched during this time.
Afterward, you can reattach any of the hardware that was removed during the preparation.
Once this has been done, you can enjoy your newly painted furniture and place it anywhere that you want it to be!
You should be proud of the new lease of life you have given this piece of furniture.
Here’s how my fabulous bar cabinet makeover turned out!
View this post on Instagram
==> Follow me on Instagram @EditorsFaves and tag me in your DIY furniture flips so I can check it out!
How To Properly Paint Furniture – Conclusion
Painting furniture can be a highly rewarding experience that allows you to work on a DIY project and save a little money.
As long as you are following the steps above, then there is no reason why you should not be left with something that has been finished to a high standard.
Your furniture will have your personal touch in this way, and it is exciting to see your ideas coming together.
What To Read Next
- How To Choose A Great Area Rug
- 10 Minimalist Living Room Ideas That Will Inspire You To Declutter
- 14 Modern Accent Chairs Your Living Room Will Love


